

SciMethods: Simultaneously recording from four neurons using PatchStar and MicroStar manipulators
Christian Wilms1, Therese Abrahamsson2, Per Jesper Sjöström2
1 Scientifica Ltd., Uckfield, UK
2 Centre for Research in Neuroscience, Department of Neurology and Neurosurgery, Brain Repair and Integrative Neuroscience Program, The Research Institute of the McGill University Health Centre, Montreal General Hospital, Montreal, Quebec, Canada
Introduction
Since the advent of whole-cell patch clamp recordings over three decades ago1, one of the most advanced and powerful applications of the technique has been to record from multiple cells2,3 or multiple locations within a single cell4 at the same time. This approach has been used to reveal details of local input processing by dendritic branches5-7 as well as to probe neuronal connectivity8-14.
Especially in preparations where connectivity is sparse, recording from several cells at once increases the likelihood of finding connected neurons. This likelihood increases with the number of cells recorded simultaneously, as more connections can be tested. But every additional recording channel requires further (expensive) equipment and space for manipulator placement. Thus, it is necessary to balance the increased number of testable connections with the costs, both in terms of funds and space. In practice, quadruple recordings are a good compromise, allowing for 12 connections to be tested in a single recording session, at the cost of less than two regular dual recording rigs. Figure 1 shows a typical quadruple whole-cell recording.
While powerful, simultaneous recordings of more than two cells are still only routinely performed by a small number of labs worldwide. Besides space limitations and cost, the complexity of manoeuvring several electrodes and a microscope at the same time without the electrode tips touching each other or the tissue presents a major hurdle that must be overcome. Unsurprisingly, computer controlled stages and micromanipulators have thus proven to be major facilitators of these experiments. Having the capability to automate and synchronise the movement of electrodes allows an experimenter to rapidly position the recording pipettes at a starting point well above the tissue and then by actively moving a single electrode towards the sample, locate all electrodes just above the tissue without moving them in relation to each other. For most manipulators implementing such a synchronisation functionality requires experimenters to write their own software for micromanipulator control. Scientifica offers the capability to flexibly set pipettes and microscope stages to ‘follow’ each other out of the box in the LinLab 2 software. This function can be used to control both PatchStar and MicroStar manipulators as well as the corresponding motorised microscopy stages.
In this application note, we will focus on the central aspects of setting up and performing quadruple recordings. We will not discuss the basics of patch-clamp recordings. If the reader is not familiar with these, we refer them to the excellent Axon Guide as a solid introduction to the topic15.
Implementation
The actual setup of a patch-clamp rig for quadruple recording is similar to setting up a rig with just one or two electrodes in that the same general considerations apply concerning noise reduction, vibration isolation, mechanical stability, etc. But, due to the increased complexity of the experiments, it is more important to plan for ergonomics such as ease of access to the electrodes. Particularly, the precise placement of the manipulators requires detailed planning. Besides the footprint of the manipulators, the movement during pipette exchange needs to be considered. Different manipulators offer a variety of options including flipping the electrode holder backwards, rotating either the electrode holder or the whole manipulator, and sliding the electrode holder or the entire manipulator back. Scientifica manipulators offer a number of possibilities, customisable by selecting the mounts and brackets to suit the intended rig layout. Manipulators should be set up so that all electrode holders can easily be accessed for pipette exchange without bumping into the microscope or the other manipulators. Avoiding such collisions can be supported by not mounting the recording electrodes directly on the, often bulky, headstage. Rather, electrode holders can be mounted on rods and connected to the headstage via short cables (Figure 1A). If the electrode itself, rather than the electrode holder is clamped to the rod, this can also help further reduce drift. Careful selection of connector cables (i.e. low capacitance shielded cables) will allow such a configuration to be set up without the introduction of additional noise or filtering. In addition, items such as perfusion in- and out-flow, temperature probes, and reference electrodes should be positioned so they do not hinder pipette positioning and exchange.
When positioning just one or two pipettes, it can be sufficient to work with a single, high magnification objective (40x or 60x). In the case of quadruple recordings, a low magnification objective (4x or 5x) is a crucial aid in finding and positioning the four electrodes quickly.
Although it seems an insignificant aspect, set up of the desk and working environment is a point that should be considered as well. Are the screen displaying the microscope image as well as the oscilloscope arranged in a central enough location? Are the manipulator controllers arranged in a manner that makes sense when looking at the respective pipette position on the screen? Could colour labelling screen corners/edges corresponding to the pipette arrangement as well as the manipulator controllers and possibly amplifiers help with the overview? The aim here is to allow quick and efficient control over all four pipettes without the risk of confusion between controllers.
A representative example system is shown in Figure 1. Note how the manipulators are evenly distributed around the sample chamber. This provides good separation between them for easy access to the electrode holders. A typical desk environment can be seen in Figure 1B. Each of the manipulator control cubes controls two micromanipulators. Finally, the amplifiers, digitizers and oscilloscope can be seen in Figure 1C. Note the colour labelling of the amplifiers and control cubes, which matches the colours of the corresponding oscilloscope channels.
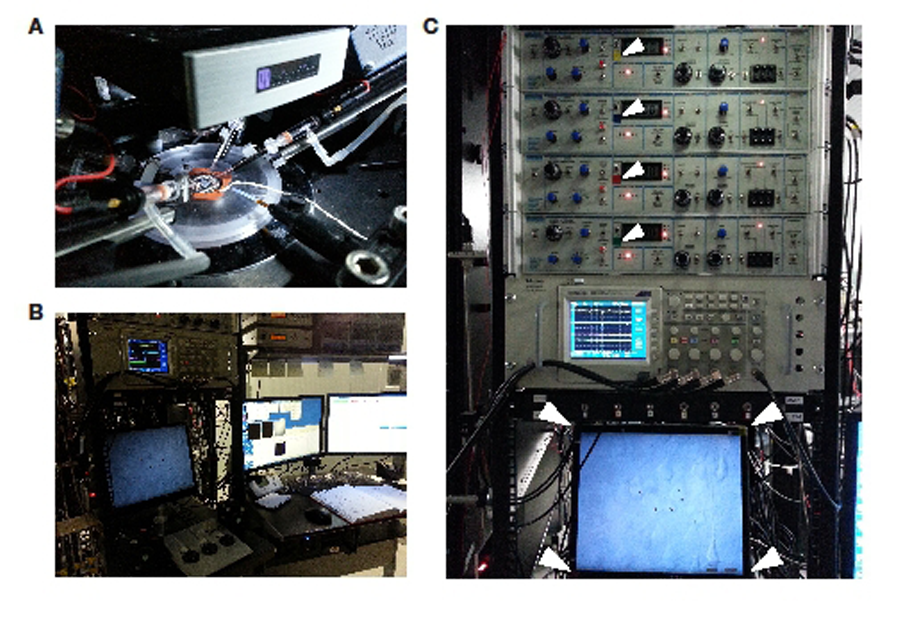
Figure 1: Layout of a quadruple recording rig. A: Placement of pipettes and additional components around the recording chamber. Please note the rod used to mount the electrode holder. B: General layout of the workspace. Note the manner in which microscope monitor and oscilloscope are positioned in a manner that they can easily be viewed while moving the stage and the electrodes. C: Close up from the experimenter’s point of view. Notice the colour labels on the amplifiers and monitor corners (white arrows) that match the oscilloscope traces.
PatchStar Micromanipulator
The most versatile motorised manipulator for electrophysiological studies. Designed with leading physiologists.
Running an experiment
As stated above, we assume that the reader is familiar with basic patch-clamp recordings and thus here only focus on points that increase in importance when using more than one electrode at a time. Many of the points raised will seem trivial, but tend to be easily forgotten.
When placing the slice in the recording chamber, it is crucial to ensure that the region of interest is positioned in the correct orientation for the planned experiment and in a part of the chamber that can be accessed easily by all electrodes. Once the slice is positioned, it is useful to not only inspect the slice at higher magnification but also to already select the cells to be patched. Ideally, an image of the cells is now saved using a computer controlled camera. This will help in positioning the pipettes relative to each other in the next step; while they are still well above the slice. If it is not possible to save an image of the cells, a simple solution is to mark their positions on the screen (using Blu-Tac, small pieces of tape or a – non-permanent! – marker, for example).
Next, all four pipettes are filled with recording solution and mounted on the electrode holders. Using the low magnification objective, the pipettes are positioned in the area corresponding to the higher magnification field of view. Using the image of the target cells as a guide, it is now possible to pre-arrange the pipettes to roughly line up with the cell positions. Doing this under low magnification and well above the slice speeds the process up and reduces the risk of damaging the pipettes or tissue.
Three of the electrodes are set to follow one ‘leader’ electrode. Still using the low magnification, the leader pipette is now lowered (taking the other three pipettes along) until the pipettes are in the bath solution, but still clearly above the slice (it might take one or two practice rounds with just a single pipette to determine this point). After switching to the high-magnification objective, the pipettes can now under visual control, be simultaneously lowered to just above the slice. At this point the ‘follow mode’ is switched off and the pipettes can once again be moved independently.
One after the other, each pipette is now moved to its respective target cell, and a gigaohm seal is formed as usual in patch-clamp recording. To minimise later disruption of existing seals, take care to start with the cell located deepest in the tissue. Once a tight seal is formed, move to the next cell, leaving the cells in cell-attached configuration until all of them are patched. Despite careful working, some movement of tissue is unavoidable. If this leads to shifts in cell location, already sealed pipettes should be carefully adjusted so they are again positioned at the original location on the respective cell. Once all cells are in cell-attached mode, they can be brought into whole cell configuration in quick succession, and the actual experiment started.
The above process, starting with the four electrodes positioned just above the slice, is shown in a video accompanying this application note (see below).
An example of a typical simultaneous whole-cell recording from four neurons is shown in Figure 2. The cells were filled with a fluorescent dye (20 μM Alexa Fluor-594) to allow full visualisation with a two-photon microscope as well as for later reconstruction. Once in whole-cell configuration, the cells were individually driven to fire bursts of five action potentials, while the remaining cells were monitored for post-synaptic responses to these spikes. In the sample quadruple recording shown, two connections were found.
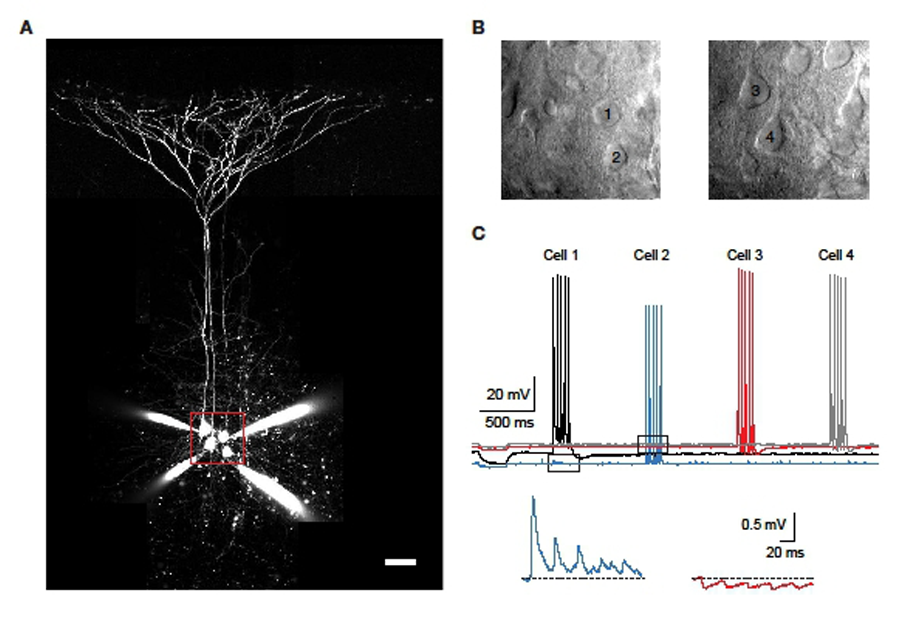
Figure 2: Quadruple whole-cell recording example. A: Four whole-cell patch-clamped layer 5 neurons in an acute neocortical slice, filled with fluorescent dye via the patch-pipettes. Scale bar: 50 μm. B: Dodt contrast images of the region indicated by the red frame in A. Two different focus planes are shown and the patched cells numbered. C: Recording in which the four cells were sequentially stimulated to each fire 5 action potentials while the other cells were monitored for post-synaptic responses (top). The bottom two traces are magnified regions indicated by the dashed boxes above, showing cell 2 responding with EPSPs to spikes in cell 1 and cell 3 responding with IPSPs to spikes in cell 2.
Conclusion
In this application note, we provide a set of simple recommendations to allow moderately experienced patch-clamp electrophysiologists to set up multisite whole-cell recordings. While we have focused on recordings from four separate cells, the general concepts equally apply to larger numbers of recording sites, and to multi-site recordings from within a single cell.
References
1. Hamill, P. O., Marty, A., Neher, E., Sakmann, B. & Sigworth, F. J. Improved Patch-Clamp Techniques for High-Resolution Current Recording from Cells and Cell-Free Membrane Patches. Pflügers Arch. 391, 85–100 (1981).
2. Miles, R. & Poncer, J. C. Paired recordings from neurones. Current Opinion in Neurobiology 6, 387–394 (1996).
3. Abrahamsson, T., Lalanne, T., Watt, A. J. & Sjöström, P. J. In-vitro investigation of synaptic plasticity. Cold Spring Harb Protoc 6, pdb.top08726 (2016).
4. Davie, J. T. et al. Dendritic patch-clamp recording. Nat. Protoc. 1, 1235–1247 (2006).
5. Larkum, M. E., Zhu, J. J. & Sakmann, B. A new cellular mechanism for coupling inputs arriving at different cortical layers. Nature 398, 338–341 (1999).
6. Larkum, M. E., Zhu, J. J. & Sakmann, B. Dendritic mechanisms underlying the coupling of the dendritic with the axonal action potential initiation zone of adult rat layer 5 pyramidal neurons. J. Physiol. 533, 447–466 (2001)
7. Larkum, M. A cellular mechanism for cortical associations: an organizing principle for the cerebral cortex. Trends Neurosci. 36, 141–151 (2013).
8. Perin, R., Berger, T. K. & Markram, H. A synaptic organizing principle for cortical neuronal groups. Proc. Natl. Acad. Sci. 108, 5419–5424 (2011).
9. Lefort, S., Tomm, C., Floyd Sarria, J. C. & Petersen, C. C. H. The Excitatory Neuronal Network of the C2 Barrel Column in Mouse Primary Somatosensory Cortex. Neuron 61, 301–316 (2009).
10. Watt, A. J. et al. Traveling waves in developing cerebellar cortex mediated by asymmetrical Purkinje cell connectivity. Nat. Neurosci. 12, 463–473 (2009).
11. Ko, H. et al. Functional specificity of local synaptic connections in neocortical networks. Nature 473, 87–91 (2011).
12. Rieubland, S., Roth, A. & Hausser, M. Structured connectivity in cerebellar inhibitory networks. Neuron 81, 913–929 (2014).
13. Song, S., Sjöström, P. J., Reigl, M., Nelson, S. & Chklovskii, D. B. Highly nonrandom features of synaptic connectivity in local cortical circuits. in PLoS Biology (ed. Friston, K. J.) 3, 0507–0519 (Public Library of Science, 2005).
14. Jiang, X. et al. Principles of connectivity among morphologically defined cell types in adult neocortex. Science (80-. ). 350, aac9462–aac9462 (2015).
15. Diverse. THE AXON GUIDE A Guide to Electrophysiology & Biophysics Laboratory Techniques. In Vitro 39, (Molecular Devices, 2008).