

#LabHacks: Tips for improving your electrophysiology experiments
by Nour Al-muhtasib, PhD
Introduction
Electrophysiology allows us to investigate the electrical activities of excitable cells, including neurons. This technique comes in a variety of shapes and sizes, each of which can be used to answer specific questions.
It has a reputation of being a difficult technique, but there are a few things one can keep in mind to make it more approachable. Before diving into some of the more technical details, this article will give a brief introduction to the methods and equipment involved in electrophysiology experiments, with a focus on patch clamp recordings in brain slices.
How patch clamp recordings work
The patch clamp technique enables recording of electrical events from a single neuron. There are several patch clamp configurations: whole-cell, cell-attached, outside-out and inside-out. When recording electrical signals, you can use current or voltage clamp. In current clamp mode, the experimenter controls the current and measures voltage changes across the membrane of the cell. In voltage clamp mode, the experimenter controls the voltage and measures conductance changes (currents). Both techniques provide different information on the electrical activity of the cells and mechanisms by which they transmit signals.
A glass micropipette is used to form a high resistance (> 1 GOhm) seal onto a cell membrane. Using suction (negative pressure) and zaps of electricity, one can rupture the membrane and gain access to the inside of the cell and measure the intracellular electrical activity in the whole-cell configuration.
Performing an electrophysiology experiment usually goes as follows:
- Prepare solutions and micropipettes
- Brain dissection
- Brain slicing and slice recovery
- Transfer slices to the recording chamber.
Each step matters, and the truth is, something can go wrong at each step. Here, we will break down the steps, explain why they are important and discuss the possible things that may go wrong.
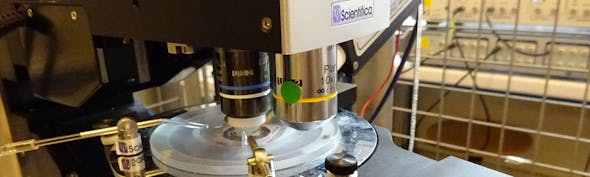
Equipment needed for patch clamp recordings
A basic electrophysiology setup includes:
- A microscope to visualise the slice
- A recording chamber to hold the slice
- A solution delivery and removal system
- An anti-vibration air table and/or a Faraday cage
- An amplifier, which allows small (<1 mV) changes in current or voltage to be measured
- An electrode holder, usually made from a polycarbonate shell
- A data acquisition system
The electrode holder provides mechanical stability and is connected to the amplifier headstage. There is a wire in the electrode holder which is usually silver and coated with a thin chloride layer. A high-resistance seal on a cell is made via application of negative air pressure through the electrode holder. As such, the electrode holder has a single port to allow the flow of air. Polyethylene tubing is connected to this port. If your lab uses a mouth pipette to provide air pressure, a simple 1-cc tuberculin syringe and an adapter can be used to connect to the tubing. With time, you will learn what the pressure feels like when you apply it. If something feels off, check the tubing. Saliva can get into it and cause blockade. Overtime, small tears in the tubing can occur at the joints so it’s good to change it regularly. Lastly, the tubing needs to be long enough to prevent tension on the electrode holder; if the holder moves around too much, this can cause pipette drift. Labs will often tape the tubing onto the head stage to help stabilize the initial section. If your lab uses a manometer, the central premise still applies.
A central theme to patch clamp electrophysiology is the need for stability. Vibrations can be introduced to your recording system from the building. A way to minimize vibrations is by using an air table. Your microscope and other components of the set up will sit on this table, which is “floated” via the use of nitrogen or a house air system.
In addition to mechanical vibrations, electrical interference can also be introduced into your recording. The currents and voltages measured in a patch clamp experiment are small and electromagnetic waves can distort your signal or introduce noise. Electrophysiology setups will often have a Faraday cage surrounding them. This is a wire mesh and helps electrodes from picking up external noise sources.

Key equipment for an electrophysiology set up
External solutions
The tissue used for recording must always be in an oxygenated (95% O2/5% CO2) solution to keep it alive for a few hours. This solution is called artificial cerebrospinal fluid (ACSF). ACSF is meant to mimic CSF and improve cell survival. ACSF contains salts, pH buffers, and energy sources. Each lab has a slightly different recipe, and many labs use ACSF of different chemical composition for slicing versus recording. The components of ACSF play important roles in ensuring cell health and normal physiology. Knowing the roles of the various components helps you understand their importance and aids in troubleshooting:
- During dissection and slicing, sodium chloride is often replaced with NMDG, sucrose, or choline. This improves the survival of cells in the slice by preventing cells from spiking, reducing excitotoxic damage. This reduces the activity of the sodium-potassium pumps, thus reducing metabolic demand. The choice of sodium replacement depends on the age of the animals. Choline and NMDG-based solutions are often used for older mice, read more tips for performing adult animal brain slicing here.
- Myoinositol or sodium pyruvate are used as additional energy sources and entry points into cellular metabolism.
- Ascorbic acid is a free radical scavenger.
- Potassium phosphate and sodium bicarbonate are buffers used to maintain a physiological pH.
- Potassium chloride (KCl) contributes to a good chemical balance and osmolarity. Potassium is the primary contributor to resting membrane potential and is largely responsible for repolarisation after spikes.
- Divalent ions, such as CaCl2 and MgCl2, are important for synaptic transmission, as well as for resting membrane potential. The concentration of divalent ions is higher in most in vitro solutions compared to CSF, to reduce the overall synaptic activity.
Divalent ions should be added last to solutions after sufficient gassing with 95% O2/5% CO2 in order to avoid precipitation. Gassing with 95% O2/5% CO2helps maintain a stable pH of 7.3 – 7.4. Not gassing enough will lead to a less stable, more basic pH and less oxygenation, which will lead to poor slices.
Internal solutions
Micropipettes are filled with a solution which serves the purpose of conducting ionic current between the electrode and the interior of the cell. The internal solution also mimics the chemical composition of the cytosol. As with ACSF, internal solutions vary according to the goals of an experiment.
Find out more about internal solutions here.
It is necessary to filter your internal solutions when you make them. If you use a syringe to fill your pipettes you can place a filter on the syringe. The osmolarity of the internal solution tends to be hypo-osmotic compared to the bath solution, in part to allow for an easier high-resistance seal.

Patch micropipettes
The last thing you need to make before you prepare your slices and start your experiment are patch micropipettes. The tip diameter of the micropipettes should be 1-2 um, which translates to a tip resistance of 2-10 MOhm. A horizontal or vertical pipette puller is used to make patch micropipettes. The middle of a borosilicate glass capillary is heated in the puller and mechanically pulled, thus forming two identical tapered electrodes (if the settings are not right the two halves will not be identical). If your puller is giving you uneven tips, it is a good idea to call the manufacturer to get some troubleshooting advice. Each puller is different, but the combination of heat values and pull velocities will determine the taper and tip diameter of the micropipettes.
There are a few things to remember about micropipette tips:
- The glass must be very clean, so be careful to not touch the middle of the capillary before you pull it.
- The size of the pipette is inversely proportional to the resistance. The bigger your tip, the smaller the resistance. If you need to make a smaller tip, increase the heat or decrease the final pull velocity.
- Smaller tips make it easier to make a seal, but the tradeoff is it is harder to break in. The opposite is true about bigger tips.
Dissection, slicing, and incubation
Healthy cells and intact networks are critical for a good experiment. Therefore, a proper dissection and slicing technique is vital. Methods will vary based on the lab and brain region of interest, but there are several factors that should always be optimised. It is important to dissect and slice quickly, use the correct solutions and a good slicer.
Before dissecting and slicing, prepare everything you need so that you can do everything as quickly as possible. You can choose to place some of the materials, including slicing chambers and stages, in the freezer, so they are cold when dissecting and slicing. The cutting ACSF can also be frozen to produce a slushy solution. Make sure all materials are clean and free of any ethanol or water, as even a small drop of water can negatively impact your slices.
In older mice, it has been found that perfusing the animal with ACSF makes for better slices (1). It was found that perfusion makes no difference in younger animals. Once the animal is sacrificed, dissect and slice as quickly as you can without damaging the brain or slice. The brain needs to be placed into a solution as soon it is dissected out. Dissection can occur while the head is submerged continuously or with periodic dipping into solution. The choice of solutions depends on the lab, age of animal, brain region, etc. Refer to the earlier portion of this post for some options.
Dissection and slicing typically occurs in cold solutions, before slices themselves are transferred to a slice chamber that is usually warmed in a water bath (32-34C). The incubation period is between 30-60 minutes and allows the slices to recover. Slices are then maintained in the chamber at room temperature until they are used for recording. The incubation chamber is usually a circular nylon net or mesh wedged in a small beaker. The slices rest on the mesh while ACSF circulates through them by bubbling the ACSF with 95% O2/5% CO2.
Improving your slice viability
Slice viability might be affected if you have issues with: ischemia, excitotoxity, suboptimal pH and osmolarity, or mechanical trauma. Here is some advice to help improve your slice viability:
- Dissect as fast as you can
- Make sure all buffers are well oxygenated
- Use NMDG, choline, or sucrose-based solutions during dissection and slicing
- Check the pH and osmolarity of all solutions
- Try slicing at different temperatures
- Slice faster….or slower. Find that happy medium.
- Check the blade angle - the bottom edge of the blade should be horizontal.
- Cut in the orientation that preserves the most amount of circuits of interest as possible.
- Wait longer after slicing to record.
- Start with younger animals first. There are many factors that can go wrong but tissue from younger animals is usually the easiest to work with.
- Check the cleanliness of all your tools and ensure you clean everything periodically.

Patching
Once the slices are ready, they can be transferred to a recording chamber. They can be placed on cover glass or a piece of netting and held in place with pins or a harp. The chamber is perfused with oxygenated ACSF which is often warmed. The speed of perfusion varies between 2-8 mL/min. An increased perfusion rate decreases loss of temperature and oxygen as the ACSF flows through the tubing.
ACSF is removed from the chamber via an aspirator. The position and speed of the aspirator can influence your recording. The aspirator should be positioned so the fluid volume in the recording chamber does not fluctuate. The recording chamber contains the ACSF, the slice, the patch and ground electrodes. It is important to maintain a closed circuit. If any ACSF leaks out, it might create a new electrical path and introduce electrical noise into your recording.
Finding cells
As a PhD student, I was told the secret to good recordings is going after good cells. The issue I ran into was, how do you know what a healthy cell looks like? It takes experience, but learning what a healthy cell looks like drastically helps your experiments. Obviously, the appearance of cells varies among brain regions and microscopes, but there are features of healthy cells that apply across set-ups. In addition, the better the microscope optics, the easier it is to find a good cell. Healthy cells may “appear” after positive pressure from the patch pipette is applied while in the tissue.
Don’t go after shriveled or bloated cells. Don’t go for cells of which you can see the nucleus or nucleolus. More contrasted cells tend to not be healthy as well. In addition, do not go after very superficial cells as their connections might be highly severed.
Do go after cells that appear smooth and have a translucent interior.
If you find that most of your cells are bloated or shriveled, there is a good chance something is wrong with your solution. Bloated cells indicate a hypoosmotic ACSF (If the outside of the cells has a lower osmolarity, the external solution will enter cells causing bloating). Shriveled cells indicate a hyperosmotic solution.
Learning which cells to approach takes some time and a lot of trial and error but is a very vital skill to hone.
Recording
Once you find a cell, it is best to fill your micropipette just before you need to use it. Before using a frozen aliquot, make sure to vortex it and spin down so that the solution is homogeneous. Once filled, place the micropipette over the wire on the holder and tighten. Be careful not to overtighten, as this can ruin the holder overtime, but an under-tightened tip might lose pressure. Then, position the electrode with a micromanipulator so that the tip is visible on your microscope camera.
Before the tip hits the bath, apply positive pressure and maintain it. This will help prevent your electrode from clogging or from anything attaching to the tip. You can use a syringe or your mouth to apply the pressure. It might be good to try both and see which one is more comfortable. Either way, with time you will learn what the pressure should feel like. If you are meeting resistance, there might be a clog within the tubing, usually saliva. If it feels too easy there might be a tear somewhere along the tubing.
Before moving forward, check the resistance of your tip. With the high-power microscope objective, you will be able to see the size of the tip and whether it is clogged.
Now you can approach the cell you previously picked. Focus down and bring your tip down. Keep doing this until you are right above the surface of the slice. If your positive pressure is good, you should see tissue being gently pushed out of the way. If you do not, it is best to change the tip and start again. There are two options of approaching the cell: you can either approach the centre of the cell from above or you can approach diagonally. With either approach the positive pressure should create a small dimple on the cell.
Once you see the dimple, zero your pipette voltage, release the positive pressure, and apply gentle negative pressure. The resistance should start to increase rapidly. What to do next varies based on how you are trained, your brain region, cell type, etc. My training taught me to wait until the resistance is above a certain voltage and to clamp the cell at my resting potential of interest (-70 mV). The resistance will continue to increase to over 1 GOhm and your leak should decrease. This is the indication of forming a good “giga ohm” seal. At this point, you are in cell-attached mode. While you can’t record subthreshold membrane potential in this configuration, you can record action potentials. You are now ready to break into the cell and this is a good time to adjust your capacitance compensation settings.
Apply a few quick pulses of negative pressure. Some amplifiers have a zap button which uses current pulses to aid in breaking the membrane. Once broken in, you can go on and record. It is good to keep an eye on a few factors to see if the cell is failing:
- Changes in the resting membrane potential (increased leak current)
- Increased access resistance
Troubleshooting
Here is some advice for a variety of problems you could encounter while performing patch clamp experiments.
- Your slices don’t look good:
- Revisit your solutions and dissecting practices to see what you can change and improve.
- Your cell looks good but you can’t form a seal:
- It could be due to a bad tip- change the tip and try again.
- You are not making contact with the cell, meaning there is still something between the tip and cell.
- The cell is actually dead.
- You get a seal but can’t break in:
- The cell might have been dead or dying.
- Check your tip size.
- You break in but lose the cell quickly:
- Again, the cell was probably not good to begin with.
- Your pipette may have drift. Check that you are securing your tip and that it is not overtightened or under-tightened. Make sure your air table is functioning properly and that vibrations are not being introduced into your solution.
- There could be a problem with the Internal solution. It’s possible for the internal solution to harm the cell if its osmolarity is incorrect. Try a different batch.
- The amplifier won’t offset in voltage clamp, sometimes it will switch to current clamp when you offset:
- Make sure ground and pipette wires are cholinerated.
- Check that your ground is properly connected and in the bath.
- Check that your stage is not leaking.
- The access resistance is increasing:
- You are losing access to your cell. Either the cell is sealing over, and you can apply a little bit of suction to open up or your tip is drifting.
- There is electrical noise in the recordings:
- Read this article for detailed steps on how to denoise your rig.
About the author
Nour is an assistant professor of biology at the University of San Francisco, completing a PhD in Pharmacology at Georgetown University. Her thesis work focused on the electrophysiological and morphological properties of D1 and D2 spiny projection neurons in the nucleus accumbens.

Still have questions? Check out our 14 sharp tips for patch clampers or contact our team of experts at [email protected].
References
1. Ting, J., Daigle, T., ,Chen, Q., & Feng, G. (2014). Acute brain slice methods for adult and aging animals: application of targeted patch clampanalysis and optogenetics. Methods Mol Biol, 1183, 221 - 242. https://www.ncbi.nlm.nih.gov/p...
Banner image credit: Dr. Jason Jacoby, Schwartz lab, Northwestern University
This article has been updated from the original layout and design published on 28th January 2019.


)