Introduction to A Deeper Look – Part 2: The path of light through your multiphoton microscope
Our Deeper Look Series will cover misconceptions, unexpected aspects, and brain teasers in multiphoton imaging. Here is the final part of our two-part introduction to the components of a typical optical path in multiphoton microscopy.
Generating an illumination pattern
At their heart, nearly all multiphoton microscopes are laser-scanning microscopes: a laser beam is focused into a (ideally diffraction-limited) spot, which is scanned in a raster pattern over or through the sample. With this approach, an image is built pixel by pixel (or voxel by voxel). The most widely used raster approach builds an image line by line, by combining a fast axis that repeatedly traces a straight line (commonly the X-axis) and a slow axis (commonly corresponding to the Y-axis) moving orthogonally to the fast axis, advancing each line down the image. If a 3D scan is required, the focal position of the point is also successively changed in the Z-axis to allow collection of multiple images at different depths.
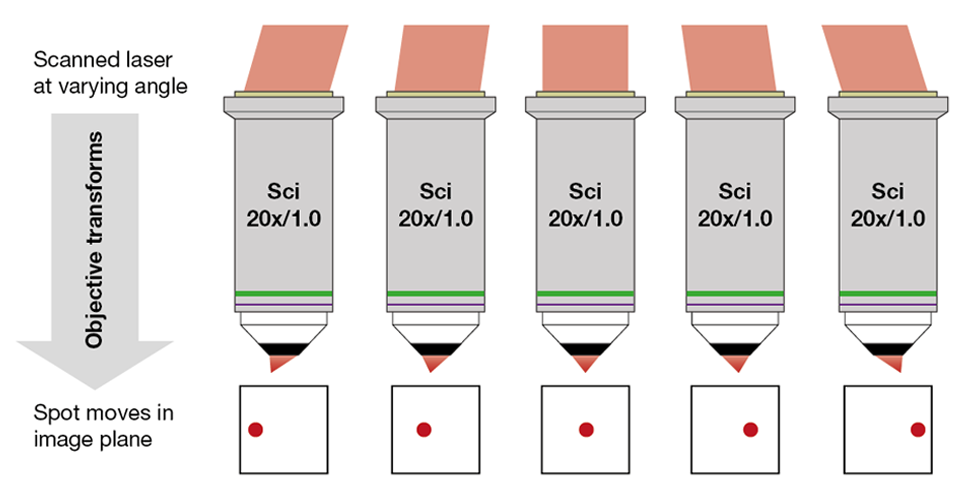
To achieve a scan over the sample, a laser beam is tilted around the objective’s back aperture, with the angle of tilt in each axis being proportional to the position of the focal spot in that axis on the sample. This tilting results from the interplay of the components comprising the intermediate optical system, which include the scanning mirrors, relay optics and scanhead telescope. We will discuss each of those components below. If we appear to hop back and forth a bit, we apologize – this is nearly unavoidable given the close link between the components.

Scanning mirrors
The most widespread approach to change the angle of the laser beam is to use mirrors which rotate around the axis of the mirror plane. In multiphoton microscopes, at least two such mirrors are used, with their rotation axes being orthogonal to each other. One of these axes is fast scanning – usually corresponding to the X-axis, while the other is slow scanning – usually the Y-axis.
The most widely used scanning mirrors are galvanometric mirrors: a mirror attached to (and rotated by) a galvanometer. In a galvanometer, the applied voltage determines the angle that the shaft rotates to. This shaft can hold a mirror. This combination allows for straightforward control of the angle that an incident laser beam is reflected at: a voltage corresponding to the desired angle is applied and leads to a very fast rotation of the mirror to that angle. Such galvo scanners are very flexible, allowing the laser spot to “raster scan” a square as described above, trace defined arbitrarily shaped lines (“line scans”), or to jump to pre-selected points in sequence (“random access scanning”). But this flexibility comes with a downside: the shaft of the galvanometer, as well as the mirror mounted on it, have mass and as a result the achievable acceleration is limited by inertia. This limits the achievable scanning speed: 1 ms per line (0.5 ms if acquiring data for both movement directions) is a common cap, even for fast galvos.
If faster scanning is required, one of the axes can be replaced with a galvanometric mirror that freely oscillates at its resonance frequency. Such resonance scanners can be much faster: 67 µs per line are typical (when acquiring data in both movement directions). This comes at a loss of flexibility. Using a resonance scanner, a user can only control the amplitude of the scan (the “zoom level”), meaning they are great for fast imaging (>30 frames per second) of rectangular images, but not for random access or arbitrary line scanning.
It is possible to get the best of both scanner types (slower but flexible, faster but inflexible) by combining a galvo and a resonance scanner to jointly scan in one axis (typically the X-axis), with a final galvo scanning the other axis (Y). This three-mirror scanning is often referred to as RGG-scanning (resonant, galvo, galvo) and is becoming increasingly popular.
Coupling multiple scanning mirrors
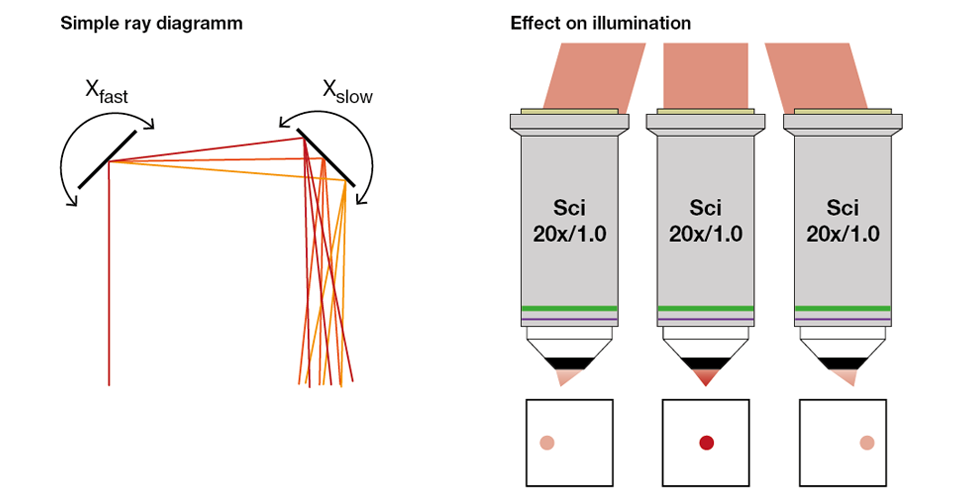
When scanning mirrors are simply placed in sequence, the first scanning mirror will change the angle of the laser beam, causing the beam to hit the next mirror at that angle, but also offset from the centre of the mirror (see the left panel of Figure 2). This shifting feeds through all the way to the objective, with new shifts added for each scanning mirror. The result is that the laser beam doesn’t just change angles at the objective back aperture, but also wanders over it. When the scan pattern is then imaged onto the objective back aperture through the scan and tube lenses (see next section), this so-called beam wobble is also transferred. If a laser beam is set to overfill the back aperture (see next section), the wobble results in the beam being clipped at the back aperture, which in turn leads to a loss of illumination light and hence image brightness at outside of the centre of the image (see right panel in Figure 2). While this effect is typically reduced by positioning the scanning mirrors as close as possible to each other, it cannot be fully avoided in this manner. Indeed, the resulting vignetting is a common feature in most images acquired with laser scanning microscopes.

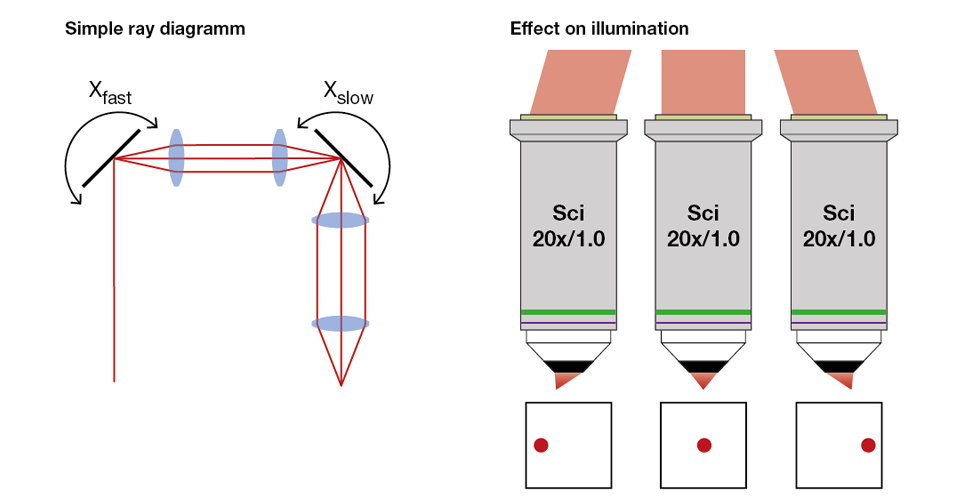
A way to fully solve the wobble issue is to image the scanning mirrors on to each other. This is achieved by using a simple telescope (“relay lenses”), between scanning mirrors (see Figure 3 left). The result is that at the final mirror the beam is still hitting the centre of the mirror, while changing its incidence angle on that mirror based on the scanning introduced by the previous mirrors (in amplitude and axis).
As before, the last scanning mirror is then imaged onto the back aperture of the objective through a telescope formed by the scan and tube lenses. In contrast to the situation described above, the beam remains in a fixed position at the back aperture and only changes the angle. This leads to a much more even illumination with nearly no vignetting (see right panel of Figure 3 below).

If the scanning mirrors are properly imaged onto each other and the objective back aperture, they are said to be located in conjugate planes of the objective back aperture. This conjugation makes optical coupling of other devices such as adaptive optics straightforward – a topic for a future article.
On to the objective
As mentioned above, the final telescope in the excitation light path is formed by the scan lens and the tube lens. This scan head telescope plays two main roles:
- It images the final scanning mirror onto the objective back aperture, ensuring that the scanning mirrors are conjugated to the back aperture of the objective as described above.
- It expands the beam to properly fill (or overfill if desired) the back aperture of the objective.
The objective focuses the scanned laser beam into the sample. In doing so, the angle changes at the back aperture generate a 2D scan pattern at the focal plane in the sample (see Figure 1 above). As expected, moving the objective up and down shifts the focal plane in the sample. Besides for focusing, this is what is commonly used to add the third scanning axis and turn the 2D image scan into a 3D volume scan.
The level of filling at the objective back aperture is determined by the combination of the beam expander in the launch optics (see the first part of this introduction) and the scan head telescope. The expansion in the scan head is fixed by the optical design of the microscope. Changing it would also change the accessible field of view of the microscope. Instead, if the filling of the objective back aperture is to be changed, this is best achieved by altering the beam expansion on the table.
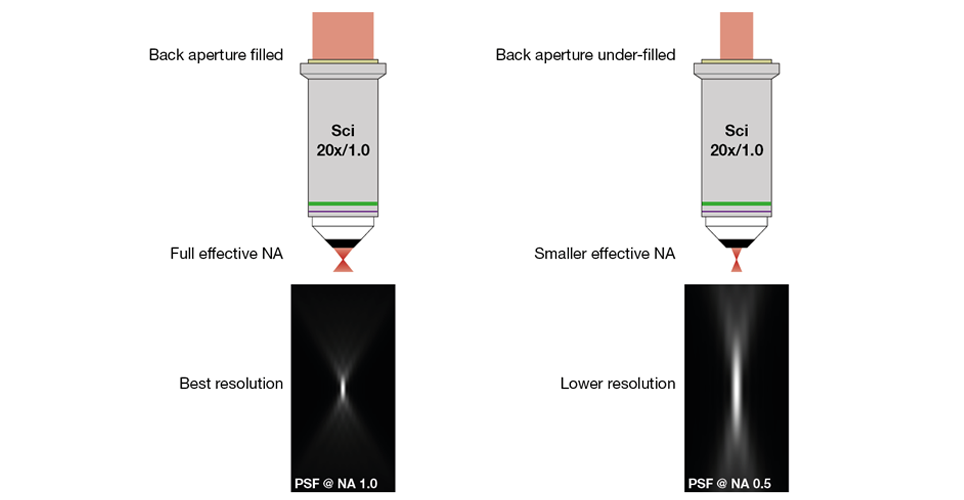
Why would a researcher want to change the filling of the objective back aperture? The level of filling is a key parameter in determining the performance of the objective for focusing. The ability of an objective to focus light is expressed in the numerical aperture (NA). The larger the NA, the larger the angle of the light cone leaving the objective. A higher NA means the angle of that cone is larger. The relationship between the NA and the resolution is given by Abbe’s diffraction limit (d = l/2NA). For a given wavelength, the larger the NA of an objective, the better the resolution (Figure 4 below shows the focal spots resulting from two different effective NAs).
To achieve the full numerical aperture of the objective for excitation, it is necessary to fully fill the back aperture of the objective (see the left panel in Figure 4). Underfilling the back aperture leads to a reduction of the effective excitation NA. As a result, the resolution deteriorates, with an especially pronounced increase along the axial dimension (see the right panel of Figure 4). As laser beams have a Gaussian intensity distribution, “filling” the back aperture makes necessary to actually overfill it. To achieve the maximum NA, only the 1/e2 core of the beam should be captured by the objective back aperture.

Which brings us back to the question would a researcher ever want to intentionally underfill the back aperture and reduce the resolution?
While in many cases a researcher will of course want to achieve the best possible resolution, this is not always the case. A focal volume (i.e. point spread function – PSF) that is extended in the axial dimension will image a thicker optical section of a sample. This means that more cells or other structures will be captured per image. It also means that movement in the axial dimension (e.g. through breathing or heartbeats) won’t move the sample out of focus as severely. The downside is that those additional structures are “smudged” on top of each other, leading to crosstalk between different cells or cells and the surrounding extracellular space (e.g. neuropil in the central nervous system). As with many aspects of experiments, these different factors need to be balanced to achieve the best conditions for the experiment at hand.
Conclusion and outlook
The two introductory articles were aimed at providing a reasonable concise reminder of the components of a typical optical path in multiphoton microscopy. The focus was on the excitation part of the microscope (i.e. everything from the laser to the objective). We have left the excitation and detection of fluorescence (with a small exception at the very end) for a separate future article. Over the course of the coming months we will be adding more in depth articles – both on topics touched on here and completely new topics. If there are topics you want to know more about (or you would like to write about), drop us an email at [email protected].
Generating an illumination pattern
At their heart, nearly all multiphoton microscopes are laser-scanning microscopes: a laser beam is focused into a (ideally diffraction-limited) spot, which is scanned in a raster pattern over or through the sample. With this approach, an image is built pixel by pixel (or voxel by voxel). The most widely used raster approach builds an image line by line, by combining a fast axis that repeatedly traces a straight line (commonly the X-axis) and a slow axis (commonly corresponding to the Y-axis) moving orthogonally to the fast axis, advancing each line down the image. If a 3D scan is required, the focal position of the point is also successively changed in the Z-axis to allow collection of multiple images at different depths.
To achieve a scan over the sample, a laser beam is tilted around the objective’s back aperture, with the angle of tilt in each axis being proportional to the position of the focal spot in that axis on the sample. This tilting results from the interplay of the components comprising the intermediate optical system, which include the scanning mirrors, relay optics and scanhead telescope. We will discuss each of those components below. If we appear to hop back and forth a bit, we apologize – this is nearly unavoidable given the close link between the components.

Scanning mirrors
The most widespread approach to change the angle of the laser beam is to use mirrors which rotate around the axis of the mirror plane. In multiphoton microscopes, at least two such mirrors are used, with their rotation axes being orthogonal to each other. One of these axes is fast scanning – usually corresponding to the X-axis, while the other is slow scanning – usually the Y-axis.
The most widely used scanning mirrors are galvanometric mirrors: a mirror attached to (and rotated by) a galvanometer. In a galvanometer, the applied voltage determines the angle that the shaft rotates to. This shaft can hold a mirror. This combination allows for straightforward control of the angle that an incident laser beam is reflected at: a voltage corresponding to the desired angle is applied and leads to a very fast rotation of the mirror to that angle. Such galvo scanners are very flexible, allowing the laser spot to “raster scan” a square as described above, trace defined arbitrarily shaped lines (“line scans”), or to jump to pre-selected points in sequence (“random access scanning”). But this flexibility comes with a downside: the shaft of the galvanometer, as well as the mirror mounted on it, have mass and as a result the achievable acceleration is limited by inertia. This limits the achievable scanning speed: 1 ms per line (0.5 ms if acquiring data for both movement directions) is a common cap, even for fast galvos.
If faster scanning is required, one of the axes can be replaced with a galvanometric mirror that freely oscillates at its resonance frequency. Such resonance scanners can be much faster: 67 µs per line are typical (when acquiring data in both movement directions). This comes at a loss of flexibility. Using a resonance scanner, a user can only control the amplitude of the scan (the “zoom level”), meaning they are great for fast imaging (>30 frames per second) of rectangular images, but not for random access or arbitrary line scanning.
It is possible to get the best of both scanner types (slower but flexible, faster but inflexible) by combining a galvo and a resonance scanner to jointly scan in one axis (typically the X-axis), with a final galvo scanning the other axis (Y). This three-mirror scanning is often referred to as RGG-scanning (resonant, galvo, galvo) and is becoming increasingly popular.
Coupling multiple scanning mirrors
When scanning mirrors are simply placed in sequence, the first scanning mirror will change the angle of the laser beam, causing the beam to hit the next mirror at that angle, but also offset from the centre of the mirror (see the left panel of Figure 2). This shifting feeds through all the way to the objective, with new shifts added for each scanning mirror. The result is that the laser beam doesn’t just change angles at the objective back aperture, but also wanders over it. When the scan pattern is then imaged onto the objective back aperture through the scan and tube lenses (see next section), this so-called beam wobble is also transferred. If a laser beam is set to overfill the back aperture (see next section), the wobble results in the beam being clipped at the back aperture, which in turn leads to a loss of illumination light and hence image brightness at outside of the centre of the image (see right panel in Figure 2). While this effect is typically reduced by positioning the scanning mirrors as close as possible to each other, it cannot be fully avoided in this manner. Indeed, the resulting vignetting is a common feature in most images acquired with laser scanning microscopes.

A way to fully solve the wobble issue is to image the scanning mirrors on to each other. This is achieved by using a simple telescope (“relay lenses”), between scanning mirrors (see Figure 3 left). The result is that at the final mirror the beam is still hitting the centre of the mirror, while changing its incidence angle on that mirror based on the scanning introduced by the previous mirrors (in amplitude and axis).
As before, the last scanning mirror is then imaged onto the back aperture of the objective through a telescope formed by the scan and tube lenses. In contrast to the situation described above, the beam remains in a fixed position at the back aperture and only changes the angle. This leads to a much more even illumination with nearly no vignetting (see right panel of Figure 3 below).

If the scanning mirrors are properly imaged onto each other and the objective back aperture, they are said to be located in conjugate planes of the objective back aperture. This conjugation makes optical coupling of other devices such as adaptive optics straightforward – a topic for a future article.
On to the objective
As mentioned above, the final telescope in the excitation light path is formed by the scan lens and the tube lens. This scan head telescope plays two main roles:
- It images the final scanning mirror onto the objective back aperture, ensuring that the scanning mirrors are conjugated to the back aperture of the objective as described above.
- It expands the beam to properly fill (or overfill if desired) the back aperture of the objective.
The objective focuses the scanned laser beam into the sample. In doing so, the angle changes at the back aperture generate a 2D scan pattern at the focal plane in the sample (see Figure 1 above). As expected, moving the objective up and down shifts the focal plane in the sample. Besides for focusing, this is what is commonly used to add the third scanning axis and turn the 2D image scan into a 3D volume scan.
The level of filling at the objective back aperture is determined by the combination of the beam expander in the launch optics (see link: first part of this introduction) and the scan head telescope. The expansion in the scan head is fixed by the optical design of the microscope. Changing it would also change the accessible field of view of the microscope. Instead, if the filling of the objective back aperture is to be changed, this is best achieved by altering the beam expansion on the table.
Why would a researcher want to change the filling of the objective back aperture? The level of filling is a key parameter in determining the performance of the objective for focusing. The ability of an objective to focus light is expressed in the numerical aperture (NA). The larger the NA, the larger the angle of the light cone leaving the objective. A higher NA means the angle of that cone is larger. The relationship between the NA and the resolution is given by Abbe’s diffraction limit (d = l/2NA). For a given wavelength, the larger the NA of an objective, the better the resolution (Figure 4 below shows the focal spots resulting from two different effective NAs).
To achieve the full numerical aperture of the objective for excitation, it is necessary to fully fill the back aperture of the objective (see the left panel in Figure 4). Underfilling the back aperture leads to a reduction of the effective excitation NA. As a result, the resolution deteriorates, with an especially pronounced increase along the axial dimension (see the right panel of Figure 4). As laser beams have a Gaussian intensity distribution, “filling” the back aperture makes necessary to actually overfill it. To achieve the maximum NA, only the 1/e2 core of the beam should be captured by the objective back aperture.

Which brings us back to the question would a researcher ever want to intentionally underfill the back aperture and reduce the resolution?
While in many cases a researcher will of course want to achieve the best possible resolution, this is not always the case. A focal volume (i.e. point spread function – PSF) that is extended in the axial dimension will image a thicker optical section of a sample. This means that more cells or other structures will be captured per image. It also means that movement in the axial dimension (e.g. through breathing or heartbeats) won’t move the sample out of focus as severely. The downside is that those additional structures are “smudged” on top of each other, leading to crosstalk between different cells or cells and the surrounding extracellular space (e.g. neuropil in the central nervous system). As with many aspects of experiments, these different factors need to be balanced to achieve the best conditions for the experiment at hand.
Why not simply use an objective with a lower NA to begin with? Because the NA works in excitation and fluorescence collection. The effect in excitation is described above. In detection, the NA reflects the angle in which photons are collected by the objective. The higher the NA, the large the percentage of fluorescence photons that the objective collects. As a result, the NA should be as high as possible to allow as much light to be collected as possible from the sample. Underfilling the back aperture is an easy way to uncouple the NA in excitation and collection: when the objective is underfilled, the effective excitation NA is lower than the nominal NA, but the detection NA remains unchanged. This flexibility can be useful in some experiments, especially when aiming to image deep into tissue.
Conclusion and outlook
The two introductory articles were aimed at providing a reasonable concise reminder of the components of a typical optical path in multiphoton microscopy. The focus was on the excitation part of the microscope (i.e. everything from the laser to the objective). We have left the excitation and detection of fluorescence (with a small exception at the very end) for a separate future article. Over the course of the coming months we will be adding more in depth articles – both on topics touched on here and completely new topics. If there are topics you want to know more about (or you would like to write about), drop us an email at [email protected].


)